Get started with MailChimp by saying Merry Christmas
![]()
Christmas newsletters are a great way to show that you appreciate the part your customers play in your success. They don't have to be long or fancy to be effective, and with the right tools and a little bit of work, you could be sending out a well-designed newsletter to your customers in less than 30 minutes.

In this tutorial, we’re going to use MailChimp for creating the newsletter because it’s simple and easy to use, and it’s free if your email list has less than 2,000 subscribers.
1. Sign up to MailChimp
The first step is to sign up to MailChimp. The sign-up form is fairly straightforward – but be sure to fill in all the fields as instructed. It’s important to have accurate information in your MailChimp account as there are certain rules and regulations in place to stop spammers from using the service.
2. Add your email list
Now that you have a MailChimp account, you’ll need is a list of email addresses to send your newsletter to. If you’re using Timely, you can automatically sync your customers’ email addresses with MailChimp using the MailChimp integration. There are detailed instructions on doing that here. Alternatively, you can import a list or add the email addresses in manually.
To add a new list, click on “Lists” in the left sidebar in MailChimp and click on “Create List” on the top right of the page. You will be asked to provide some details about the list. Fill out the form and hit “Save.”
3. Select a template (optional)
The MailChimp templates are pre-designed themes that you can drag and drop your content into. They’re wonderful if you’re short on time, as they’ll produce a professional-looking newsletter in minutes.
If you’d like to use a template for your email newsletter, click on the “Templates” button on the left sidebar when you’re in MailChimp, and select a template to use with your newsletter. There are several holiday-themed templates under the “Holidays” section.
If you’ve chosen a template, you’ll be presented with a screen where you can customise the layout. Don’t worry about adding content yet. That comes later. When you’re satisfied with the template, click “Save and Exit” at the bottom.
4. Create a campaign
You’re now ready to create a campaign. Click on “Campaigns” in the left sidebar of MailChimp, then click on the “Create Campaign” button on the top right of the page.
On the next screen, you’ll be asked to choose a type of campaign to send. The “Regular ol’ campaign” option will work for most uses. Once you hit “Next,” you’ll be asked to select the email list to send the newsletter to, as well as add your campaign’s name and related information.
Fill out all the fields, and try to make the “Email Subject” something that will stand out. Remember that most people get hundreds of emails a day, so you’ll want to cut through that noise with your subject line. There are tools for testing how effective your email subject is, like the subjectline.com website.
Once you’ve done that, hit “Next” and select your template. If you chose a template in step 3, select it here; otherwise, choose the “1 column basic theme.”
Now you’re ready to move onto designing the newsletter!
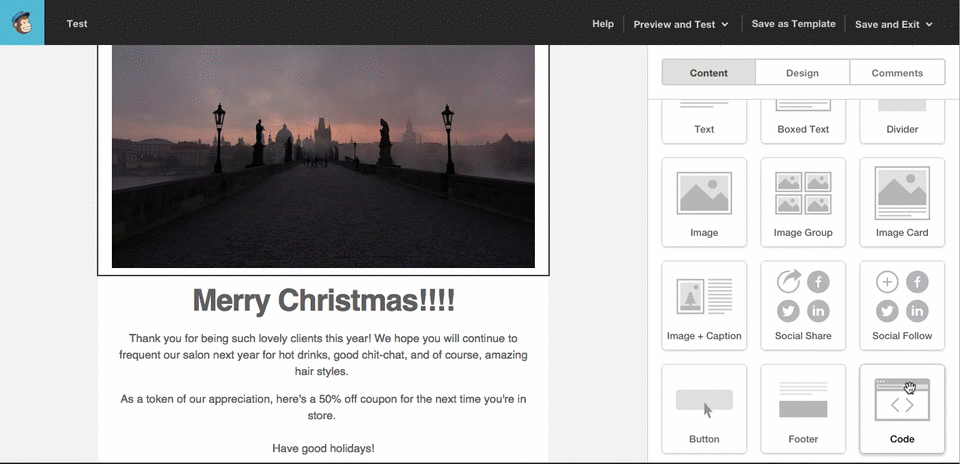
5. Design the newsletter
Designing a newsletter in MailChimp is simple. Click on boxes to edit the content in them, and drag boxes from the sidebar into the email to add new elements.
Start off at the top and add a preview of the content to your email in the field that has this in it: “Use this area to offer a short preview of your email’s content.” This is the first part of the email your customers will see, so add something in there that might capture their interest, like: “Christmas specials from our salon”
Then work your way down, adding your images, text, and anything else by dragging the boxes in from the right.
Here’s a MailChimp tip: you can add tags to your email that will personalise it for each customer. For example, instead of saying, “Hi there,” at the start of your email, write “Hi *|FNAME|*” and it’ll automatically address the recipient by their first name.
The images you use will have a huge impact on what your newsletter looks like. Good photography will give it a professional feel, while low-quality images will degrade the look of your email. If you’re short on good photos, check out the UnSplash website, where there are hundreds of high quality images that you can download and use for free without having to worry about copyright issues.
Once you’ve added all of your content and you’re satisfied with your email, click on “Preview and Test” on the top bar to see how your email looks.
You can now move onto the confirmation page by hitting “Next” at the bottom. Don’t worry – this won’t send your email out just yet.
6. Confirm and send the email
On the confirmation page, you’ll be presented with a checklist to make sure everything has been added to your newsletter as it should. All the checkboxes should be green before you send the email out. If some of them are yellow, there will be a link below the topic that explains how to fix the problem.
Once you are satisfied with your design, content, and settings, and you want to send your email out, hit that “Send” button on the bottom bar.
High five! You’ve just sent an email marketing campaign.
7. Check on progress
It may take a few minutes for the email to go out, and usually you’ll have to wait an hour or so before you can see how well your newsletter has been received. Click on the “Reports” button on the left sidebar in MailChimp, and it will show you how many emails have been successfully delivered, how many have been opened, and how many people have clicked on links in your email.